[UPDATE: As of 2011, Tim Farrar has stopped developing his FFDD HDR script, possibly because of the appearance of so many good user-friendly HDR programs. I still have a copy of the script and use it regularly but I have removed the links below that no longer resolved.]
Why an HDR tutorial? By popular request, and also to a lesser extent because I’ll enjoy doing it and might even benefit from it myself. In order to do so, I must make an assumption and two statements. First, I suppose that my esteemed readers will have found my previous HDR-related posts, particularly Still playing with exposure blending and HDR, HDR photography meets quantum physics and Discussing HDR photography. Next, I solemnly declare being a newbie at HDR and warn said readers that my rambling should be taken with a grain of salt, if not of 400 ISO. I strongly urge anybody interested in HDR to check out the links I’ll provide throughout the post because they are quite comprehensive and in many cases much more thorough than I could ever be. I must also emphasize that this cannot really be a tutorial because most readers will not yet have available the scripts I’m referring to, and could not compare or practice. So I’ll call this a comment on my workflow rather than a tutorial.
My first contact with HDR was an accident, or rather a coincidence. I was scrolling through albums on Flickr and came upon a category of rather stunning – while a little surreal – photographs. I researched the subject and immediately knew I was going to like it. It was called High Dynamic Range. It opened new doors and unleashed a photographer’s creativity in ways that very much appealed to the landscape maniac I am.
Further research soon revealed that HDR was in its infancy, and that much debate surrounded it. I began looking for tutorials and actual tools. Three main streams emerged from the many pages I read: it seemed HDR pictures were most often generated via either a piece of software called Photomatix, through Photoshop’s integrated merge tool, or via other less known scripts or programs. 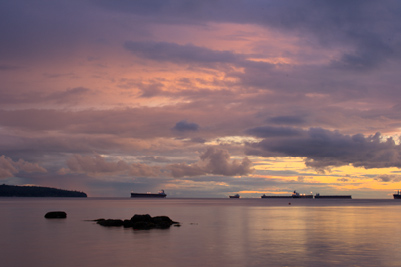
I started by playing with Photomatix (HDR blend above) for some time but while it created fascinating images, the necessary tone mapping made them a little abstract and painting-like. The program is very good at rendering complex textures and does wonders for interior scenes in artificial lighting but I find it too extreme for landscape photography.
So I went on to try Photoshop’s “Merge to HDR” tool (left); it was all right but the results still didn’t impress me that much.
Then one day, I found Timothy Farrar’s brilliant set of Photoshop scripts and actions, Farrar Focus Digital Darkroom 5 [link removed]. I dropped everything else I was doing and immersed myself in HDR, learning the art, refining my workflow and experimenting with the new camera I ordered along with the script. ;- ) That was a year ago.
I’m still passionately shooting most of my landscape pictures in HDR and every day I learn a new trick or technique. So my so-called tutorial will concentrate more on workflow and personal preferences then on HDR itself as a technique. Because of the radically different nature of tools like Photomatix, Photoshop and the scripts I use, some of the steps I describe might not apply to someone using a different tool. Bear with me however, and do yourself a favor: if you are considering HDR seriously and are not completely satisfied with what you’ve found so far, you owe it to yourself to have a look at Timothy’s scripts. As far as I am concerned, they simply rock.
I use a Canon Digital Rebel XTi (400D) (2011 update: I have since then moved on to a Canon XSi and recently to a 7D) DSLR and my only lens for the time being is the cheap 18-55mm that came with the body. A sturdy tripod is a must and I carry it everywhere with me. I also use a cable remote in order to avoid camera shake, as well as mirror lock once in a while. The camera is always set to manual mode to give me full control on depth of field, and I obviously shoot RAW pictures with the camera set to the Adobe RGB color space (closer to the giant ProPhoto I use in Photoshop.)
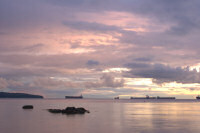
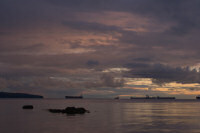
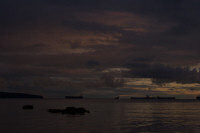
As long as I am doing landscapes, I systematically bracket all my exposures, taking a series of 3 shots for each scene: underexposed by 2 f-stops, correct metered exposure and overexposed by 2-stops. I make sure to vary speed rather than exposure in order to keep depth of field constant. When initially metering the scene and deciding on where to start the bracket, I do my best to “expose (to the) right” [link removed], choosing to offset the 3 exposures slightly towards the right of the histogram to maximize signal-to-noise ratio. More than 3 exposures would be beneficial for the technique I use but I haven’t gotten that far yet and I will need an even better tripod because the extra manipulation required will increase the risk of moving the camera between shots. Timothy Farrar wrote a great page on the selection of adequate bracketed exposures [link removed] for HDR blending. Below are the 3 exposures captured for this page’s example:
Once back at the base, the magic begins. The current version of Timothy’s scripts, FFDD5, runs from Photoshop and allows me to open 3 RAW files via Camera Raw, leaving them untouched and linear, and then blend them into a 16-bit HDR digital negative. Like any such file, the resulting negative still needs development but it now has a much better tonal range than the originals did individually. There is no tone mapping involved since the process is different and the image generated isn’t actual HDRI, which would be unreadable by my screen. We have simply combined the best of all three shots and end up with a dynamic range that is closer to 8 stops, as opposed to the 5 we started with.
Now some of the other actions written by Timothy come into play. Again his site has a very thorough explanation of the development process, but I’ll resume it by saying that I add adjustment layers on which I set brightness and contrast separately, as well as saturation. This is similar to using graduated  neutral density filters in the field, only much more flexible and powerful. For example, to achieve a pleasant, natural looking sunset, I’ll typically have to set brightness for the mid-tones, boost contrast up, and then darken the sky and lighten the foreground. I sometimes end up with up to 10 or even 15 adjustment layers (right) – which are non destructive – that I’ll only flatten at the end.
Here, a short parenthesis is in order. I have been testing the new version of the blending script and it’s quite amazing. Working on DNG files instead, it is much more intelligent and allows for better batch processing. It will identify properly named groups of files in a folder and its subfolders, blend them accordingly into a high-res digital negative, and also generate a low-res version of the picture to which I can then apply my adjustment layers much faster. I save the newly developed low-res file with its layers and go back to the script to make it generate a high-res version of the original blend, completely developed and ready for final tweaking. Quite awesome.
My now developed digital negative routinely receives a dose of denoising combined with some sharpening, both of which are done by – yes you guessed it – more actions from FFDD5. However, I must insist on the fact that the HDR blending achieved by FFDD5 is by itself the most amazing denoising tool I’ve ever encountered. The process easily beats both Photoshop’s internal noise reduction tools and third-party plugins, and once again it is non-destructive. With FFDD5, noise suppression is obtained by adding tonal range to an image, rather than by suppressing existing noise in a conventional way which unavoidably causes a loss of sharpness and slight blur of the image. So in the end, while the main purpose of HDR blending remains for me the gain in tonal latitude required to render landscapes the way I see them, I value the noise reduction just as much, especially with printing in mind.
The following is a 200% crop of the results (keeping in mind that my lens is soft): both sides were processed with the same brightness, contrast and saturation adjustment layers. On the left is the correct single exposure from the series of 3 bracketed ones; on the right is the final blended HDR exposure, denoised and sharpened.

Last, I?ll straighten a tilted horizon, reduce lens distortion if needed, remove sensor spots if any and rethink my framing one last time, almost always aiming for compliance with the sacred Rule of Thirds or even attempting to ace the elusive Fibonacci spiral-based Divine Proportion.
 My final image (left) is saved as a full size flattened TIFF with the ProPhoto color space embedded, and then reduced to web standards for my blog, a JPEG image of around 800px horizontal size, compressed at 90% quality in the sRGB space.
I hope this will have helped a few people find inspiration and motivation to explore new fields. I might sound biased towards my favorite HDR tools, and I am. With a bit of luck, my oversimplification of things will not have annoyed the pros or offended the authors of such great scripts.
Someone was recently commenting on Kodak’s new color sensors that will be hitting the market next year, and new digital cameras soon ridding themselves of their low-light slavery to the good old flash. HDR is the logical progression for in-camera picture optimization. It?s only a matter of time. Wait and see?